
VPN Bonding
This page details step by step how I accomplished aggregating two separate internet connections into one, seemingly single, connection to the Internet. This “single” connection has a greater bandwidth capacity that either of the individual connections could yield. As a side affect this also nicely doubles up as a redundant connection. This method can be used for achieving link aggregation for both home and business users alike for a fraction of the cost of commercial connections / aggregation units available that do the same thing and in theory could be expanded to as many links you like however be warned, the more links there are, the more overheads there will be with tunnelling; thus potentially noticeable drops in speed.
For this demonstration I am using two Virtual Machines via VirtualBox. This enables me to experiment with without cutting my servers off from remote administration. Both machines are running Ubuntu 10.04.3 LTS (Lucid) however there is no reason this wont work for other distributions as long as you modify the steps accordingly.
Just to get this out of the way. I am not responsible for anything you might break. Be cautious when playing around with routing tables/network interfaces especially with remote servers as it could potentially cause loss of connectivity which might not be a simple fix.
Requirements
Firstly, we will cover the requirements needed for this demonstration:
- Linux bonding driver on both machines (see Initial Setup)
- Server with a fat internet connection. I have a server in a Data Center with 100Mbit link that I use.
- The remote server ideally needs to have two or more IP addresses accessible (see routing for details why)
- Two or more Internet connections at the site you wish to create the aggregated connection
- Server at the site you wish to aggregate that you can use as a Gateway device
*NB, This article is now quite old. I’ve heard that newer versions of ifenslave break this now*
How It Works
The idea behind this is quite simple and has been around for a long time. Think of it in terms of plumbing. You have a narrow pipe from your house (Your ISP), to the drain outside (The Internet). This pipe can only carry so much water (Information) to its destination at any given moment. If you add another pipe and link them together you are essentially allowing both pipes between them to carry more to the destination, thus increasing throughput.
The only initial problem with this is that each of the connections to your ISP have their own routes and IP addresses. You cant simply have multiple connections to one ISP and have it magically work (Unless your ISP supports Channel Bonding and will set it up for you). What this guide aims to do (continuing from the analogy above), is wrap both pipes together with tape so that from inside the house and outside, they appear as one and carry more down tham then a single pipe on its own.
The solution is to create a VPN tunnel to your fat pipe endpoint via each connection. Once the tunnels have been bonded it will act as one interface. Your remote fat pipe server will appear as one IP address but all traffic to that new IP address is being split down both links and vice versa. Once at the other end, as its VPN tunnelled, your server will see it as originating from the same IP inside your network, regardless of the route it takes. This then enables you to route it to the Internet and back with ease.
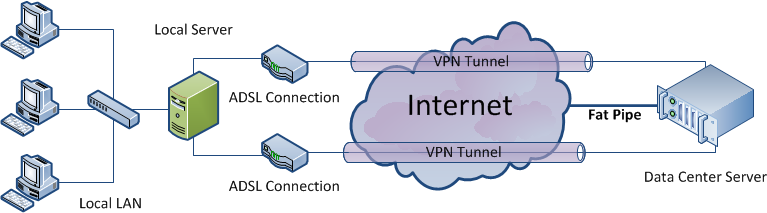
Diagram
This diagram summarizes the setup we are trying to achieve:
Initial Setup
First off we’ll install the bonding driver onto both servers. This is nice and simple: (Note # represents a command as root)
# apt-get install ifenslave
As we want to aggregate the multiple connections into one seemingly single link, I will be using Bonding mode 1, aka balace-rr. To enable this, we need to edit the /etc/network/interfaces file and add the following:
Note that my local subnet is 10.0.0.0/8 and so it is clear when I am using the tunnel, my VPN subnet will be 172.26.0.0/30
local-server# pico /etc/network/interfaces

#This should be added to the config file
 iface bond0 inet static
 address 172.26.0.2
 netmask 255.255.255.252
 bond-slaves tun0 tun1
 bond_mode balance-rr
And the remote server:
remote-server# pico /etc/network/interfaces

#This should be added to the config file
 iface bond0 inet static
 address 172.26.0.1
 netmask 255.255.255.252
 bond-slaves tun0 tun1
 bond_mode balance-rr
As a brief explanation, balance-rr does not load balance connections but actually load balances the packets.
This might seem backwards to some people but when all is said and done, we will be forwarding all internet traffic to 172.26.0.1 thus that would be our gateway. As a rule of thumb gateway’s are always the first IP in the subnet… (Usually)
Routing
For this to work, we need to ensure that we have separate connections to our endpoint. These separate connections need to travel through each internet connection. For arguments sake, I have two ADSL connections and thus two routers on my network – 10.0.0.1 and 10.0.0.254.
My fat pipe endpoint also needs to have two IP addresses. For this example – 87.117.217.27 and 87.117.217.44. These will enable me to ensure that my tunnels are routed via separate ISPs.
On my local server I need to do the following:
local-server# ip route add 87.117.217.27 via 10.0.0.1 dev eth0
local-server# ip route add 87.117.217.44 via 10.0.0.254 dev eth0
Note: If you want to aggregate more than two connections, using this method you would need the same number of remote IP addresses as you do Internet connections to ensure that traffic is sent via each interface.
Please be aware that this is by no means an elegant solution…
Creating VPN Tunnels – Using SSH
I originally decided to use SSH tunnels when I was playing around with bonding as both of my servers already had OpenSSH installed which meant no messing about installing/configuring OpenVPN (SSH is so versatile!). The only caveat to this method is that it requires you to allow SSH Logins via Root. It is also worth noting that using SSH Tunnels for the VPN connections essentially means you are tunnelling TCP over TCP which can potentially have a lot of overheads, especially via SSH due to the encryption and compression should you use it. See this article for some more information.
At this stage I’d like to point out that whilst I did use SSH, you can potentially use any VPN/Tunnelling technology such as OpenVPN – as long as you get a tun/tap interface that you can use with the bonding driver. That is however out of the scope of this article. If you will be using another technology or protocol to create your tun or tap devices then you can skip ahead to Bonding the links
As mentioned at the top of this page, my end point is in a Data Center. It is however a VM running on my server. Primarily this was to prevent me from losing access to my machine if I broke things however it also adds the security of, if the machine is compromised, the intruder doesn’t have access to any of my services.
Never the less, we will secure it as much as possible… You need to edit your /etc/ssh/sshd_config file on your Remote Server and change/add the following:
PermitRootLogin without-password
PermitTunnel yes
PasswordAuthentication no
Once that is done, add some keys from your local server to your remote server so that you can ssh to the root account. More information on SSH Keys can be found here or simply by googling.
Once you have confirmed that you can SSH to the root account of the remote server from the root account of your local server you are ready to go.
We will be making use of the -w parameter of ssh. This will create a tunX interface on both ends that we will later bond together.
local-server# ssh -NTCf -w 0:0 87.117.217.27
local-server# ssh -NTCf -w 1:1 87.117.217.44
- -N Do not execute a remote command. This is useful for just forwarding ports (or in this case tunnels).
- -T Disable pseudo-tty allocation.
- -C Requests compression of all data (including stdin, stdout, stderr, and data for forwarded X11 and TCP connections). Compress can speed up or potentially slow down your speed, so try with and without.
- -f Requests ssh to go to background just before command execution.
If this is successful, ifconfig -a on both machines should reveal a tun0 and tun1 interface!
# ifconfig -a
 tun0 Link encap:UNSPEC HWaddr 00-00-00-00-00-00-00-00-00-00-00-00-00-00-00-00
 POINTOPOINT NOARP MULTICAST MTU:1500 Metric:1
 RX packets:0 errors:0 dropped:0 overruns:0 frame:0
 TX packets:0 errors:0 dropped:0 overruns:0 carrier:0
 collisions:0 txqueuelen:500
 RX bytes:0 (0.0 B) TX bytes:0 (0.0 B)

tun1 Link encap:UNSPEC HWaddr 00-00-00-00-00-00-00-00-00-00-00-00-00-00-00-00
 POINTOPOINT NOARP MULTICAST MTU:1500 Metric:1
 RX packets:0 errors:0 dropped:0 overruns:0 frame:0
 TX packets:0 errors:0 dropped:0 overruns:0 carrier:0
 collisions:0 txqueuelen:500
 RX bytes:0 (0.0 B) TX bytes:0 (0.0 B)
Great! Now we can proceed to bonding them.
NOTE: It might be advisable at this time to check netstat to ensure that you have connections coming in from separate ISPs:
remote-server# netstat -an | grep ":22" | grep ESTABLISHED
 tcp 0 48 87.117.217.27:22 66.118.190.24:54284 ESTABLISHED
 tcp 0 0 87.117.217.27:22 78.33.121.161:50165 ESTABLISHED
 tcp 0 0 87.117.217.44:22 92.40.207.249:56158 ESTABLISHED
The bold addresses are my tunnels and the other is a terminal I have open to execute netstat. The command I used shows only connections on port 22 (default ssh port) and will only show Established ones. Looks like we are good to go!
Bonding the links
This part is relatively easy now all the heavy lifting is done. As mentioned above, we have created a bond0 interface on both servers that have two (or potentially more) slaves, tun0 and tun1. To bring this interface up we simply execute the following on both servers
This should be done on both servers:

# ifup bond0
 # ifconfig bond0
 bond0 Link encap:UNSPEC HWaddr 00-00-00-00-00-00-00-00-00-00-00-00-00-00-00-00
 inet addr:172.26.0.X Bcast:172.26.0.3 Mask:255.255.255.252
 UP BROADCAST RUNNING MASTER MULTICAST MTU:1500 Metric:1
 RX packets:41 errors:0 dropped:0 overruns:0 frame:0
 TX packets:2 errors:0 dropped:0 overruns:0 carrier:0
 collisions:0 txqueuelen:0
 RX bytes:8054 (8.0 KB) TX bytes:168 (168.0 B)
Presto! Both interfaces are now up and running. You can test to ensure it is working by trying to ping each other
# ping 172.26.0.1
 PING 172.26.0.1 (172.26.0.1) 56(84) bytes of data.
 64 bytes from 172.26.0.1: icmp_seq=1 ttl=64 time=28.3 ms
 64 bytes from 172.26.0.1: icmp_seq=2 ttl=64 time=28.2 ms
 64 bytes from 172.26.0.1: icmp_seq=3 ttl=64 time=25.9 ms
Next you ned to remove the default gateway of your local server (if there is one) and tell it to use the remote server’s VPN address as its gateway instead:
local-server# ip route del 0.0.0.0/0
local-server# ip route add 0.0.0.0/0 via 172.26.0.1 dev bond0
All that is left is to enable ipv4 forwarding on both servers and add a route back to your internal network on the remote server and then you should be all set for using the local server as a gateway for the internet!
To enable:
This should be done on both servers:

# sysctl net.ipv4.ip_forward=1
To enable permanently:
This should be done on both servers:

# echo "net.ipv4.ip_forward=1" >> /etc/sysctl.conf
And then to tell the remote server how to get back to our network so that our requests get answered:
remote-server# ip route add 10.0.0.0/8 via 172.26.0.2 dev bond0
A pinch of iptables hackery:
remote-server# iptables -A FORWARD -o eth0 -i bond0 -s 10.0.0.0/8 -m conntrack --ctstate NEW -j ACCEPT
remote-server# iptables -A FORWARD -m conntrack --ctstate ESTABLISHED,RELATED -j ACCEPT
remote-server# iptables -A POSTROUTING -t nat -o eth0 -j MASQUERADE
Your local server should now be able to access the world wide web. Note that this server should, in this example at least, have an IP in the 10.0.0.0/8 subnet. That is the IP you use for your gateway on all your other machines to allow them to use the aggregated link.
I will at a later stage document automating the whole process as much as I can and have some form of connection monitoring in case the ADSL links stop working. Watch this space!
NAT
If everything was done correctly, your bonded link should be up and running. Your remote server should be able to “see” your local server via its VPN IP address and vice versa! If this is the case then most of the leg work has been done for you.
All outgoing connections to the internet from your local server should now be appearing as if they are from your remote server’s IP address, in my example, 87.117.217.27. (You can quickly test this by using whatismyip.com). Lets say that you want to access a web page that you have set up on the local server that gives statistics about your setup. We will use iptables to acheive this:
We are assuming that your remote server connects to the internet via eth0
remote-server# iptables -A PREROUTING -t nat -i eth0 -p tcp -m tcp --dport 80 -j DNAT --to-destination 172.26.0.2:80
Once this is done, any connection to http://87.117.217.27 should be transparently forwarded down your bonded link to the other end which should serve your web page.
This could also be expanded to, for example, allow Windows Remote Desktop to one of your internal computers to be accessible via the bonded link, or any service inside your LAN to be accessible from the publicly routable address of your remote server
remote-server# iptables -A PREROUTING -t nat -i eth0 -p tcp -m tcp --dport 3389 -j DNAT --to-destination 10.0.0.60:3389
NOTE: For the example above for forwarding RDP connections, the PC you are forwarding to will need to have its gateway set to the 10.0.0.0/8 address of the machine hosting the bonded link else it wont know where to send the responses to.
I found Karl Rupp’s NAT page to be helpful in explaining NAT with iptables!